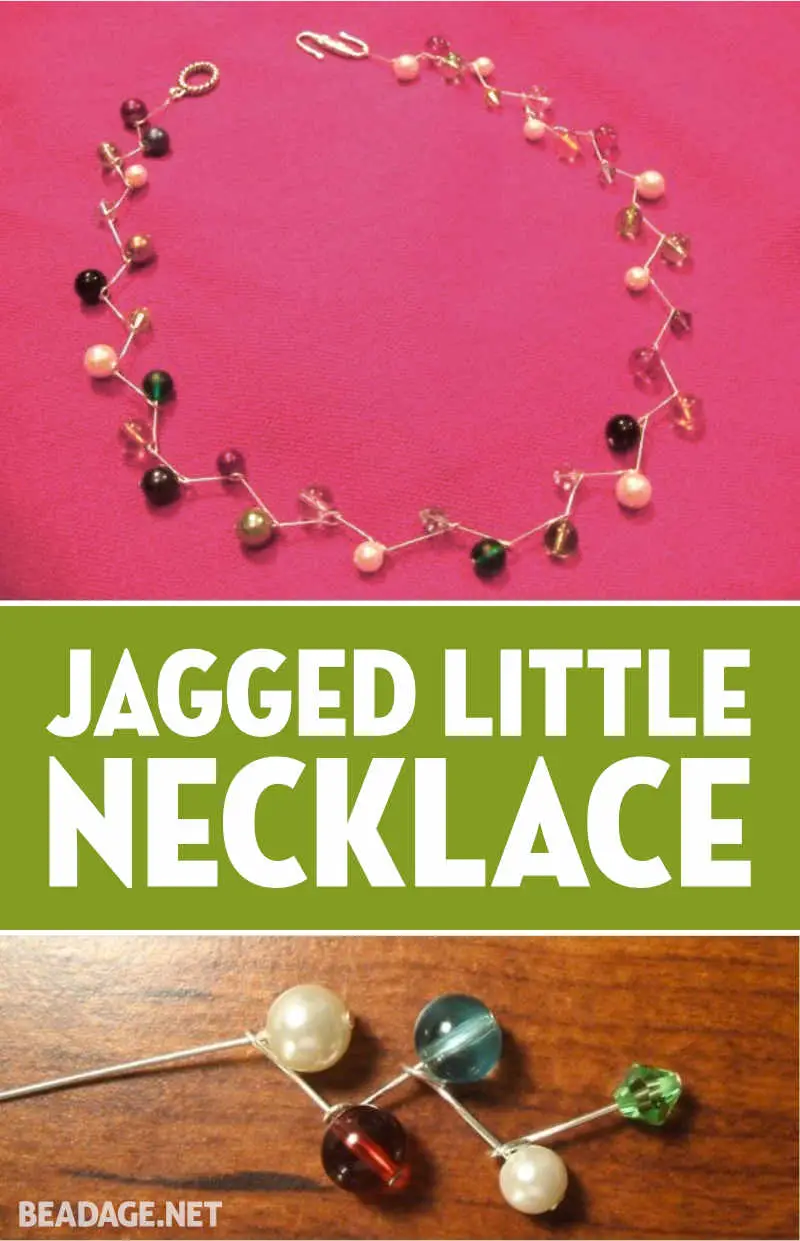
Sleek and feminine, this vibrant necklace is as colorful as it is creative. It’s very simple and fast to make as well.
Supplies
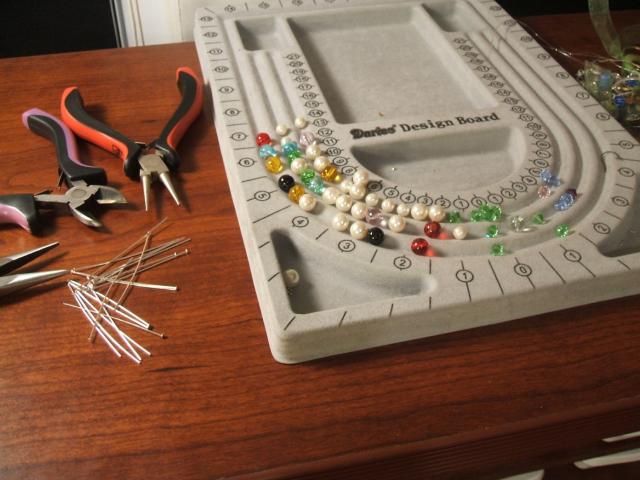
Tools
Materials
- around 40 headpins
- variety of colorful beads – throw in some Swarovski crystals to make it sparkle
- a clasp
Instructions

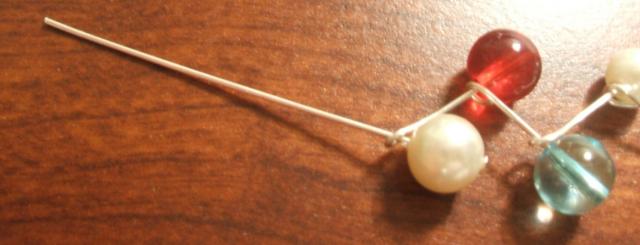
Put your first bead on a headpin. Lay it aside.

Now put your second bead on a headpin. If it’s too long, cut it to about an inch.
 Make a small loop in it.
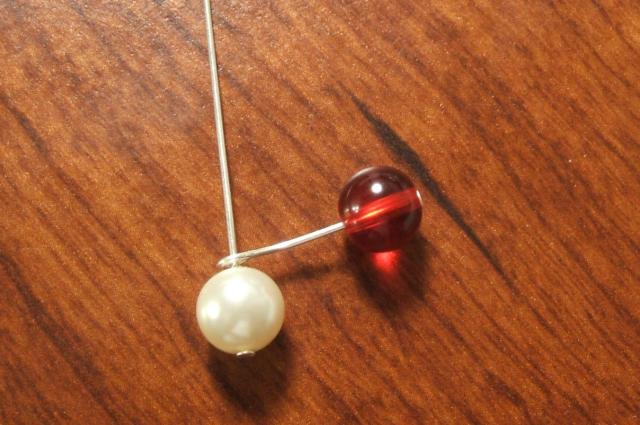
String the wire of your first bead (pearl) through the eye of your second bead (red).

Repeat the process you did for the second (red) bead, but before closing your loop, make sure it’s going around the wire of the previous (red) bead. Now this bead will go upward to form a zig zag.
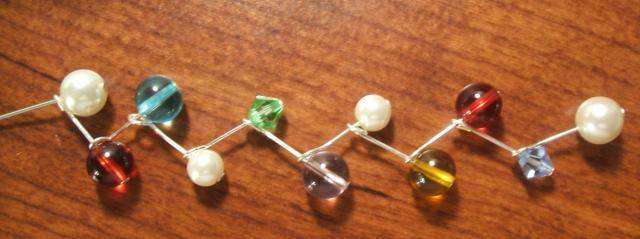
Continue this process by alternating your various colored beads and crystals. The shape continues to be formed as you do more loops and connect to the previous bead — some going upward and some going downward to create a jagged effect.
Once you are done adding and connecting your beads, go back to the first bead (pearl) that had the uncut headpin.
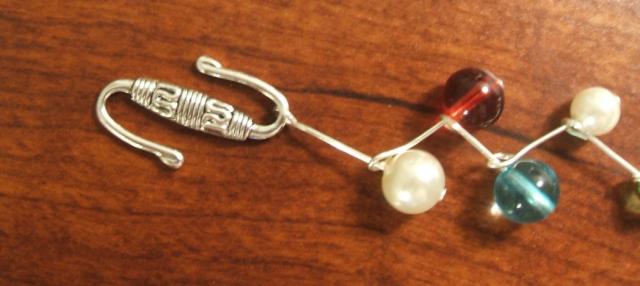
Snip it in half and make a loop at the end; add the one half of your clasp. After your final bead on the other end, you’ll make a double eye pin; the loop of one end of your double eye pin will connect to the wire of your last bead, and the loop at the other end will go through the other half of your clasp.
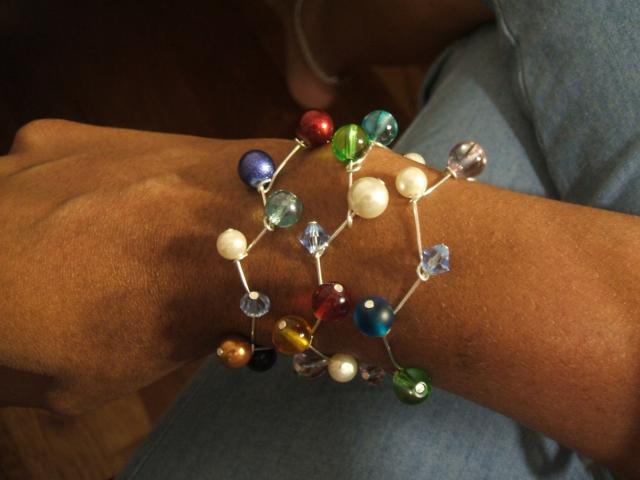
As an added bonus, it even wraps around for a funky bracelet.
Enjoy making and wearing this unique and versatile piece!


")


")
")


Nice and very freshlooking, Michele! I’ve never seen this technique before, so I’d like to publish it in my blog, if you allow me. With every detail about your grat blog and site, of course. Let me know.
Alessia
Hi Alessia,
Emma here, I run the Beadage site. We’d be happy for you to link to us or write about us, as long as the content itself is not copied. Thanks!
Emma
Since making this as a matching set i have had no end of compliments. i am a self taught beader and i found this project fun and very enjoyable
Thank You
This project, which I made with green and white lamp work beads on the bottom and coordinating green opaque beads on top with gold head pins launched my tiny little business. I am very excited! Thank you for this wonderful idea!
This was my very first beading project of this sort (I have done the wire and bead keychains that were a hit in the 90s) and it turned out wonderfully! I made this for one of my friends as a graduation present with silver head pins and blue, green, and amber faceted glass beads with a toggle clasp. I spaced the beads a bit closer together and I love how it turned out! Seeing as I only finished it about five minutes ago, I really hope she likes it! As a sixteen-year-old, I found it to be a very easy project. Thanks a bunch for sharing this design!
This site is amazing. I am new to jewellery making and have just set up a trial website for my very basic jewellery but now i can add so much more thanks to this easy to use straight talking easy to follow website. Thank you for making it so easy for the complete beginner.
Lovely and original design, Michele! Thank you for sharing it. 🙂
THANK YOU for such a lovely site!
I’m currently battling breast cancer, & have made beaded bracelets (strung on elastic) to use as a countdown for how many more rounds of chemo I’ve left (14). After each round, I remove a bracelet. Then it hit me, I should make more for the ladies where I receive my therapy. So, I’ve been beading like a maniac. Nothing fancy, just colourful designs. I wanted other women to have a nice way to do their own countdown. OK, I’ve gone on about that long enough!
The point is, I’ve realized that I love beading. I plan on making this necklace for myself. I never would have figured out how to do it without this wonderful site.
Thank you so very much,
Tamara
Tamara,
Hats off to Emma, who does a great job of running this site! I’m no longer writing the beading tutorials, but I’m always happy to hear how much my fellow beaders enjoy these projects. Tamara, all the best to you as you continue your battle…your ideas are inspirational, and I’m sure the other ladies will be inspired by your project ideas, as well. You are in my thoughts and prayers! Glad you find such joy in beading…it’s an excellent therapy in itself!
Michele
I mixed it up and found that if the beads are not relatively the same weight,
it won’t hang like a zig zag. It isn’t bad unless you put a large bead in the center as I did- then it goes haywire and looks like a jumble.
This is awesome… I’ve just started making my own jewelry and i’m addicted… i love this style…i’m going to try it, hope it comes out great.
hi i am an advanced beader i just started selling my jewelry to friends and people who wnt to buy them.
but i have a question is it illegal to for instance make this desingn and sell or do i need to pay copyrights
Hello there,
Just want to let you know that I am a beginner and you helped me to
make my own jewelery. It gives me endless pleasure – sometimes I
struggle but it is worth it. I am 63 and keeps myself busy with this
wonderfull hobby. Thank you for making an old lady happy.
Greetings.!!!!
Martie
Marianne…reproducing ideas is not illegal as long as you dont make an identical piece as what is being made here and claim it as your own. i make and sell jewelry for quite some time now and i get ideas from beading books and websites all the time. each idea i come across that i like i change it up quite a bit to reflect the statement im trying to make. when people ask where i got the ideas i tell them either the internet or a book (i never can remember which…how convenient lol) hope this helps
WOW WOW, am new in beading and i love your idea…so simple yet so beautiful…. suzie
I made the necklace a few days ago and all of my friends that have see it just love it, thank you for a great idea. I have been thinking of all the ways I can change it to get different looks
Wow… I love your site you created and I shared it with Guild Members on ArtFire in the Guild I created named; Jewelry Artist on ArtFire~Create. I love the meanings of the stones and this tutorial tops it all. You are amazing and thank you for sharing. Great ideas and beautiful creations.
Hugs, Debby and Thank you
lovely isn’t the word… It looks so beautiful. Thanks for sharing.
Thank you Aarti
This is neat! Thanks for this. I was looking for something new and different than all those boring beaded necklaces. This is great! I used some beautiful cobalt blue faceted beads and it looks wonderful! Of course the wires were a little tricky but I think that is from my clutzy fingers 😉 Thanks! I am going to blog about this and link to your site so other can use this design!
I saw a petite necklace made of gold eye pins and small fresh water pearls but did not save the picture….have been searching on Google for awhile now! What a surprise to come across this tutorial of The Jagged Necklace! I hope to make this, first using a broken string of cultured pearls. I am a senior citizen but don’t have a lot of time on my hands…yet..
So glad you enjoyed this tutorial! I had almost forgotten I made this, and it’s easy and fun to try. Your own project with the cultured pearls sounds beautifully promising! Have fun and happy beading!!
Michele